Sorry, the video is currently unavailable.
Setting up a Site/House in Sitemap
Portal Properties
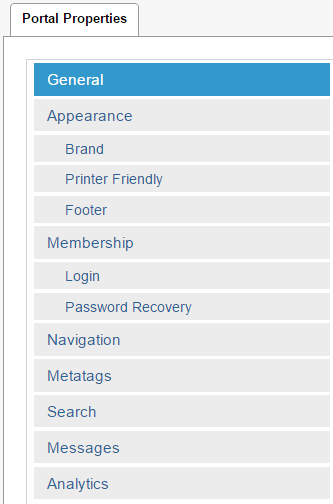
Clicking on the house icon opens the Portal Properties menu, from which all of the primary website settings can be configured. Certain aspects of the Portal Properties are developed prior to deploying the website. However, a site administrator may edit a variety of data points based on the needs of the site over time. All information stored within the Portal Properties is developed to behave and appear in specific ways across a website, pulling information from these settings dynamically based on preprogrammed rules.
General Settings
The General tab includes some basic information regarding the company, including contact information and what is known as an “Upsell Message”, customizable by site administrators to display unique content when a user reaches an error or unauthorized page. This data is dynamically pulled into different areas of the site, including error pages.
| Name of Field (* = required field) |
Type of Data |
Description of Data |
| Company (Abbreviation) |
Plaintext |
Abbreviated company name |
| Company (Full Name) |
Plaintext |
Full company name |
| Website Title |
Plaintext |
Appended to the page name of each webpage (ie. “Home - Apprende”) |
| Contact Email |
Plaintext |
Primary email address of the site administrator or company |
| Contact Phone Number |
Plaintext |
Primary phone number of the site administrator or company |
| Contact Fax Number (optional) |
Plaintext |
Primary fax number of the site administrator or company |
| Contact Address 1 |
Plaintext |
Primary street address of site administrator or company |
| Contact Address 2 |
Plaintext |
Secondary street address of site administrator or company (such as apartment, suite, etc.) |
| Contact City, State Zip |
Plaintext |
City, state, and zip code of site administrator or company |
| Home Page |
Plaintext |
URL slug of the homepage. Clicking on the site logo or “Home” links will navigate to this specific page. Defaults to “~/Default.aspx” |
| Upsell Message |
WYSIWYG Rich-Text Editor |
Rich-text editor textbox used to display a custom upsell message to unauthorized users who attempt to access an authorized page. Users who have not logged in may instead be taken to the default Member Login page.
Logged-in users may also see this message if they attempt to access pages they are not authorized to view.
|
Appearance Settings
The site appearance settings are broken into three different sub-sections: Brand, Printer Friendly, and Footer. While these settings will dictate the default appearance of an entire website, each individual page can be customized to appear with different styles.
Brand
The “Default Brand” field provides a dropdown list of all available CSS styles that have been built for a site. The CSS code dictates every aspect of the visual representation of a website. Custom CSS code can be written to provide a variety of “themes” depending upon what is required of the website. Each individual page has this same list available within their details to select an individual theme for a page where desired.
By default, all newly created pages will inherit the brand of the parent page. In many cases, the “parent” page is the Portal, and all child pages will continue to inherit that default theme if no other brand is selected.
Printer-Friendly
The “Printer-Friendly Page” is what appears when users click a link to view a “printer-friendly” version of a webpage. It typically removes all CSS styles and provides a basic HTML mock-up of the page to condense content and remove the need for excessive ink when printing a webpage.
The “Header Content” and “Footer Content” fields provide SmartDoc pickers to choose manually created headers and footers to printer friendly pages, typically in the form of HTML snippets.
Footer
The “Footer” is what appears at the bottom of every page within a website. These can be custom-built by developers, or a site administrator can build a new SmartDoc to supply in this field to display under the primary content of every page. Headers and footers display on every webpage, and while headers typically display organization logos and navigation, footers typically display contact information as well as social media links.
Membership Settings
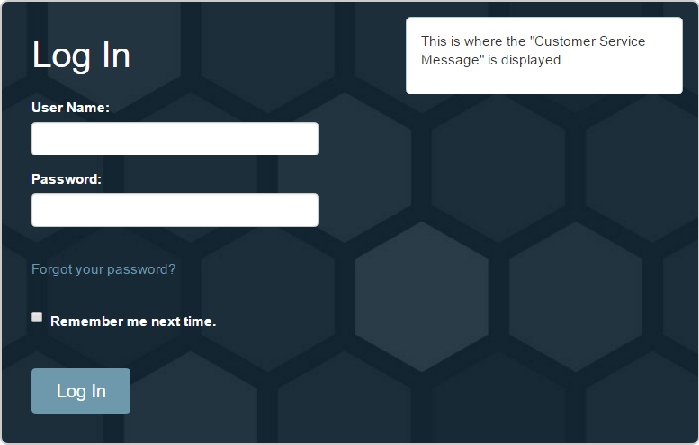
The settings contained within the Membership header primarily dictate the textual representation of the “Login” template. Users are typically prompted to login when they attempt to access pages for site members only. All text on the login template is customizable through these settings.
Login
| Name of Field (* = required field) |
Type of Data |
Description of Data |
| Header Text |
Plaintext |
Displayed above the username and password fields |
| Username Label Text |
Plaintext |
Displayed next to the “username” field |
| Password Label Text |
Plaintext |
Displayed next to the “password” field |
| Forgot Password Label Text |
Plaintext |
Text displayed as the “Forgot Password” link |
| Remember-Me Label Text |
Plaintext |
Displayed next to the “remember-me” checkbox |
| Login Button Text |
Plaintext |
Text applied to the “Login” button |
| Failure Text |
Plaintext |
Text that displays following a failed login attempt |
| Locked Out Text |
Plaintext |
Message after too many failed login attempts |
| Customer Service Message |
SmartDoc Picker |
SmartDoc content displayed on the top-right of the login template |
| Account Switching |
Checkbox |
Enables the ability for an authenticated (logged in) user to switch their identity to an Institution login |
Password Recovery
| Name of field (* = required field) |
Type of Data |
Description of Data |
| Title |
Plaintext |
Title for the Forgot Password template |
| Instructions |
Plaintext |
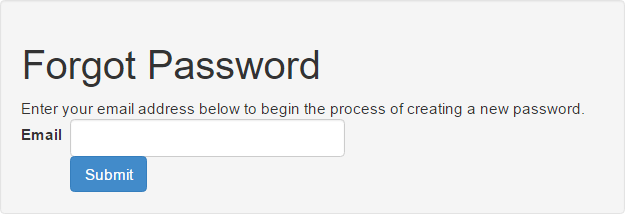
Displayed under the title, provides specific instructions to reset a password |
| Label |
Plaintext |
Displayed next to the text field for a user to submit their username |
| Button Text |
Plaintext |
Text applied to the “Submit” button |
| Failure Text |
Plaintext |
Message displayed upon password reset failure |
| Success Message |
Plaintext |
Message displayed upon successful processing (email sent to user) |
Navigation
The Navigation section contains only three editable properties:
- Top Nav Starting Offset - specifies the page level in the sitemap that will display in the top navigation (numeric value 2 - 9)
- Display Left Nav (optional) - checkbox that enables or disables the use of the left-hand navigation
- Left Nav Depth - specifies the page level in the sitemap that will display in the left-hand navigation pane (numeric value 2 - 9)
The “Top Navigation” pane includes the tabs that will appear across the Header section of each webpage. The visual appearance of the header is defined by the “Brand” selected on each page, and links will dynamically appear if selected within the individual page properties. By default, the top navigation pane will always appear on every page, including the home page.
In contrast, the Left-Hand Navigation pane will appear only on webpages that are displayed with a page type template that includes a “left sidebar”. The page templates are explained in greater detail within the Webpart Training document. Left-hand navigation panes are typically reserved for pages that have several child pages beneath them to assist with sub-navigation through the website.
Links to pages appear in either navigation pane based on the individual page settings, which will be discussed and illustrated later in this document. The offset/depth settings are numeric values attributed to sitemap “levels”. Within the default tree, consider the Portals as level 1, the pages underneath in level 2, and the pages listed under those pages as level 3, etc.
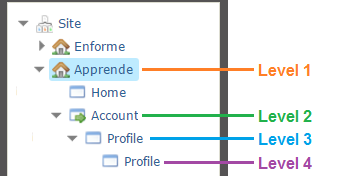
It is recommended to set the Top Nav Offset to 2 to display the first level of pages within the portal. The Left Nav Depth value will display pages in the left navigation pane beginning at the selected value, but will only display child page links of the accessed page to users (i.e. If enabled, a user on the Account page will see a Left Navigation link to Profile, and no other pages)
Metatags
Metatags are defined as HTML markup code that is applied to website code containing information for search engines. However, the use of metatags has expanded to the social media realm, as well. Most search engines use this information to display a brief description along with a link to the page name in search results. Social media platforms (such as Facebook and Twitter) utilize metatags to incorporate pre-formatted content into links to a website shared via that particular platform.
Description
As described above, this field dictates the brief description displayed on search engine results for the primary portal site. Limited to 160 characters, this will be displayed under a link to the default portal page in search engine results.
Keywords
Due to technological advances in search engine crawlers, keywords no longer assist in SEO (Search Engine Optimization) functions. This field can still be utilized as a free-form organizational asset to help differentiate between multiple portals for back-end users.
Twitter Creator
This field is meant to contain an organization’s Twitter User ID (e.g. “enformeweb”, without the @).
Facebook Admin ID
This field is meant to contain an organization’s Facebook Profile Admin ID, available by accessing http://graph.facebook.com/facebookusername. The field “fbtrace_id” will contain this value.
These fields will input necessary code into the header of a website to assist with the display of content linked from a website to Twitter and Facebook. More information can be found in the Webpart and SEO / CMS training documents.
Additionally, this article provides a detailed review of social media metadata and its uses.
Search
The Search section provides two simple fields: a checkbox to enable the Search field within the header of every page and a text field to customize the text displayed over the button next to the search field. This feature allows for users to search an entire website for any relevant information related to their search string.

Messages
The Messages section provides three separate SmartDoc picker fields to customize the messages displayed when users reach a 404 Error Page, a 500 Error Page, as well as Sitewide Messages.
404 Error Pages
A 404 Error is displayed to users when they attempt to reach a website address that cannot be found. When a user enters a URL address, or clicks a link to a page they are unauthorized to view, they will be met with a 404 error page. This field allows site administrators to utilize a specific SmartDoc to display a message on all 404 error pages.
500 Error Pages
A 500 Error is a generalized error that means something has gone wrong on a website’s server, but the server could not provide a more specific reason for the error. While this is less common than a 404 Error, it may still occur when there is a problem on a site’s hosting server, or if an internal site error has occurred to disallow the display of a particular page. This field allows site administrators to utilize a specific SmartDoc to display a message on all 500 error pages.
Sitewide Messages
A sitewide message is a unique type of content that displays at the top of every webpage, unless a user opts to stop viewing the message.
| Name of Field (* = required field) |
Type of Data |
Description of Data |
| Show Message |
Checkbox |
Enable or disable the sitewide message |
| Search |
SmartDoc Picker |
Specific SmartDoc content to display within the sitewide message field. HTML Snippets and HTML Code Snippets are typically used in sitewide messages |
| Text Hex Color |
Plaintext |
Hexadecimal color value attributed to the text within the sitewide message |
| Background Hex Color |
Plaintext |
Hexadecimal color value attributed to the background of the sitewide message |
Any SmartDoc can be used to populate a sitewide message, but simpler messages are best received by users. Images can be displayed within this field based on the SmartDoc picked. The sitewide message can be utilized for a number of uses, including advertisements or promoting new, unique, or important content on a website.
Various resources exist to find hexadecimal values for colors to be used as the text and background. Two such sites are:
- W3 Schools, which provides an intuitive interface, and
- Color-Hex, which provides unique palettes for specialized styling

Analytics
The Analytics settings contains a simple plain-text field to enter the unique Google Analytics code assigned to the site administrator upon creation. A site administrator will need to create a new Analytics account via Google's Analytics homepage. Once the account has been created, Google will provide a tracking code in the form of JavaScript code. This code will need to be entered into the “Enter Analytics” field, and appears similar to this:
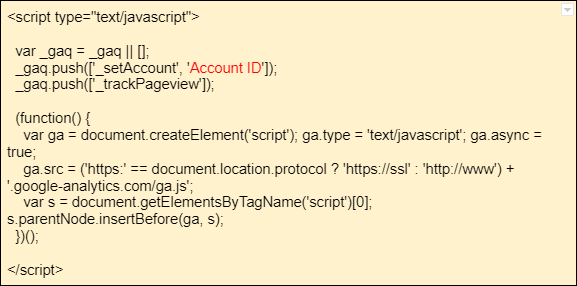
Once entered into the “Enter Analytics” field, this code will be inserted into the site code, and within a few hours information will be collected and available through the administrator’s Google Analytics account.